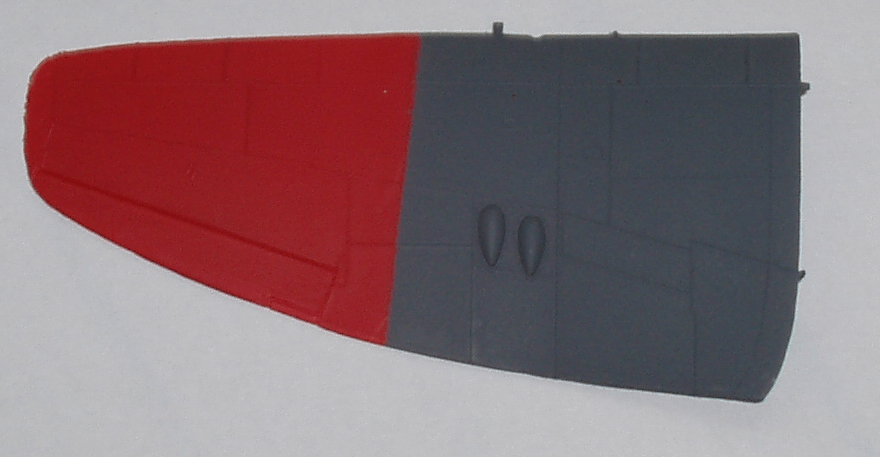
Preparing the shell for painting
I am not an expert when it comes to detailing but I have learnt the technique from an expert, Charles Hopkins. Charles is one of a few model railroader that actually shares his knowledge with everybody that likes to give it a try.
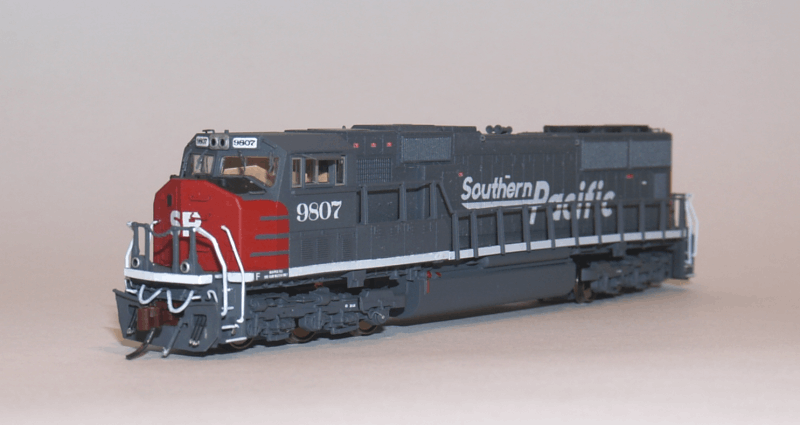
This tutorial is for complete beginners and if you already did models that look much better than the SP SD70M below or what you can see on my web site, this tutorial is not for you.
The detail parts are from BLMA, Sunrise Enterprises, JnJ Trains, and others. Some of the grab irons are self-made from .008 brass or stainless steel rods.
I use Polly Scale acrylic paint since it cleans up with water. Here is a link for a great airbrush tutorial with Polly Scale paint.
The decals are self-made on my Alps printer which gives my the advantage that I don't have to cut together the road number from single digits. I can also do some unusual decals as you will see later.
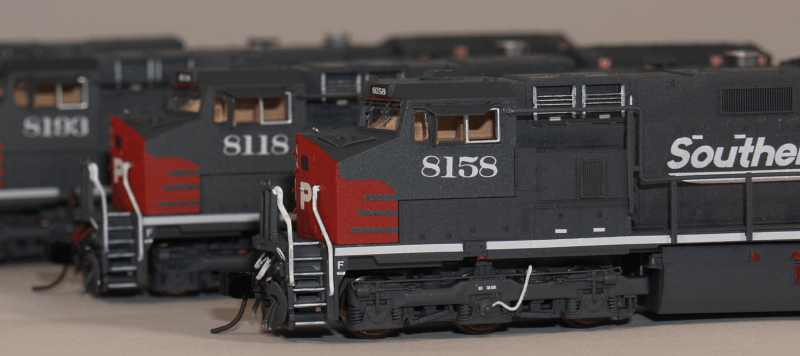
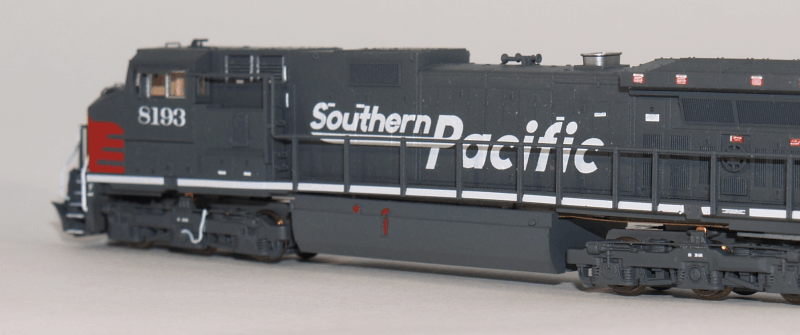
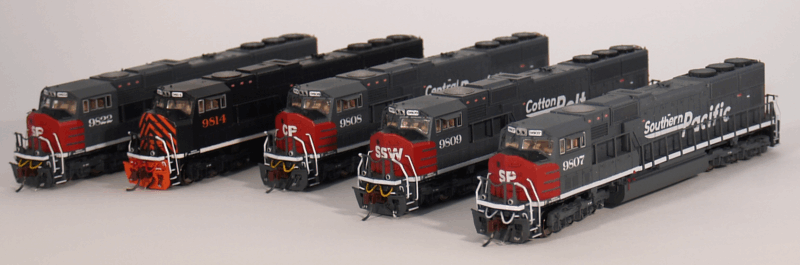
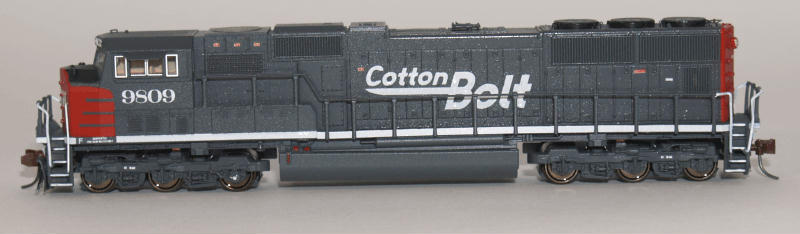
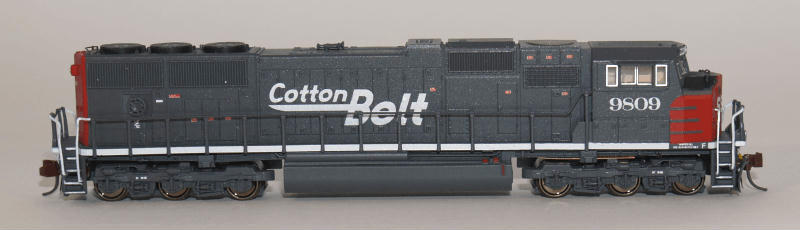
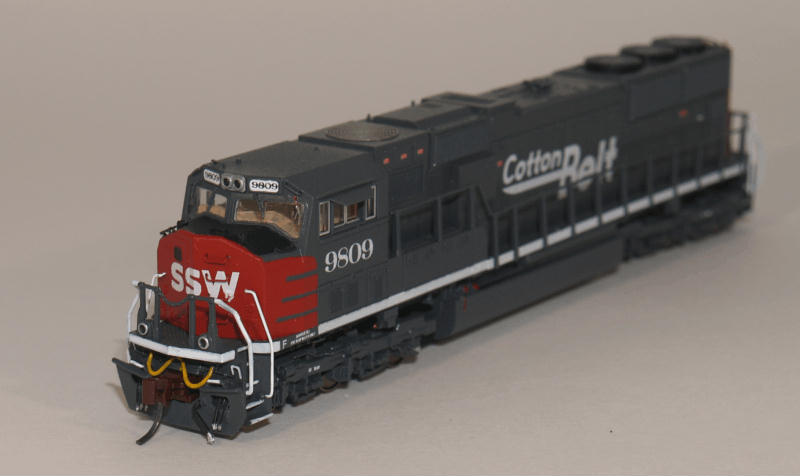
As an example I use Kato SD70M models to turn it into an Southern Pacific and fantasy Cotton Belt, Central Pacific and Denver & Rio Grande Western models (see finished models), even disregarding the fact that an factory painted SP models is available. I have learned it takes as much time to (carefully) detail a finished model as it takes me to detail and paint it. Road numbers are another problem with factory painted models. It seems Kato and Atlas have abandon the unnumbered painted model and removing numbers could have disasters results. I also like to airbrush.
Most of the tools and parts I use for detailing, I get from

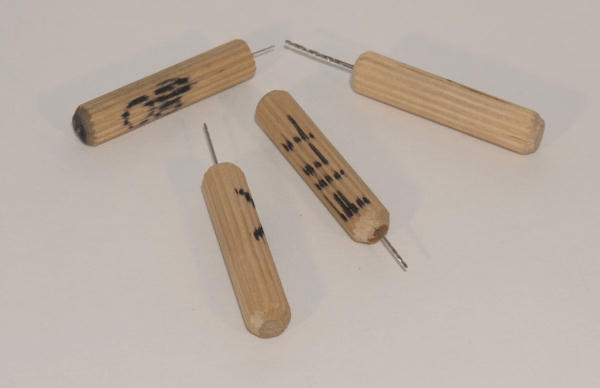
Those dowels are cheap and perfect for the small drill bits. I use a Dremel to drill the hole into the dowel, turn the drill bit around and glue it into the wood with some CA glue. If the drill bit breaks, I am usually able to pull the drill bit out with pliers and insert a new one.
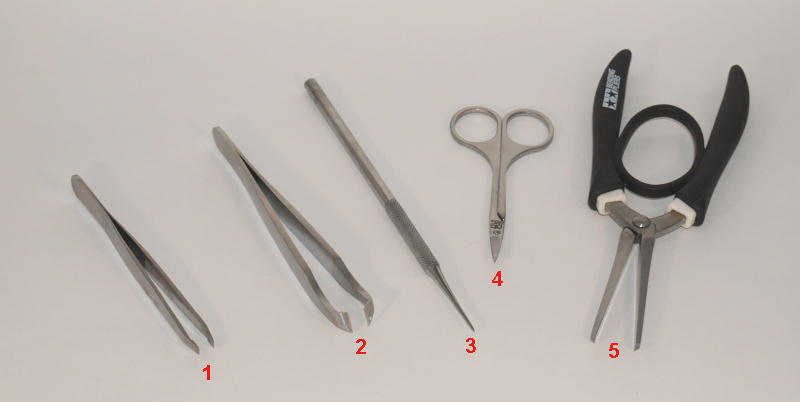
1. (expensive- I am not kidding) tweezers that hold the small part safely while dunking in CA glue puddle and applying it to the model.
2. plastic sprue cutter
3. dental tool to mark holes
4. photo etch scissors (Tamiya)
5. pliers for bending photo etched pieces and wire for grab irons
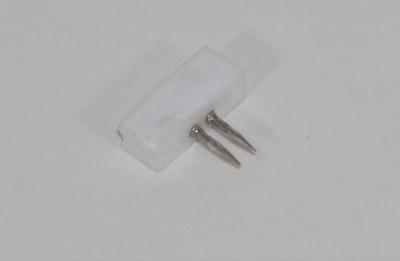
Styrene block with two metal pins from plastic thumbtacks. Charles Hopkins' 18" grab iron hole marker.
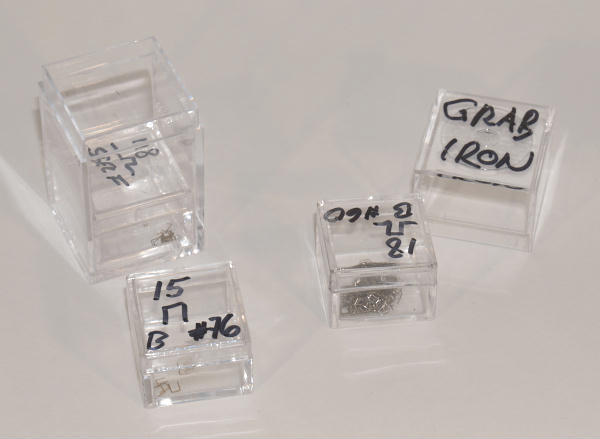
I keep my detail parts in small containers instead of the original bags. Each container is labeled with the manufacture name and number for easy re-order.
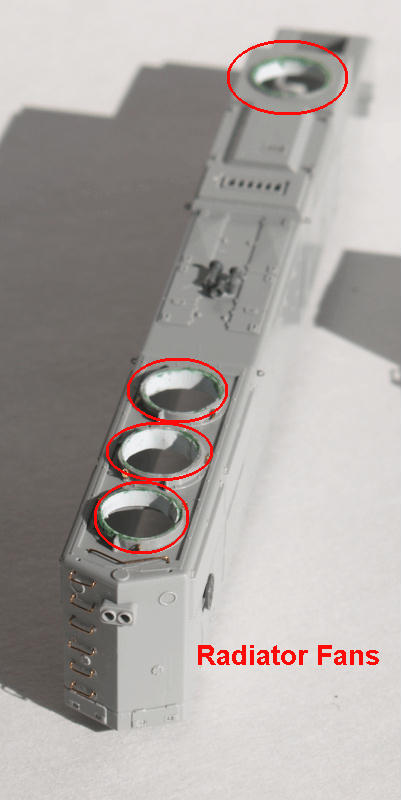
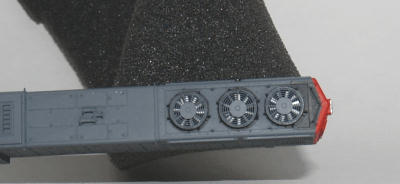
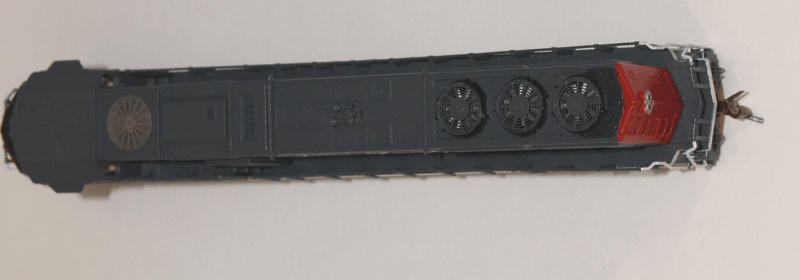
I use the BLMA fans package. There is an excellent tutorial at the BLMA side.
I add a 0.005" Evergreen styrene piece to the inside of the fan hole since the wall is very thin after removing the molded on fan grill. I used some putty to get an even surface since I was not very careful opening the holes.
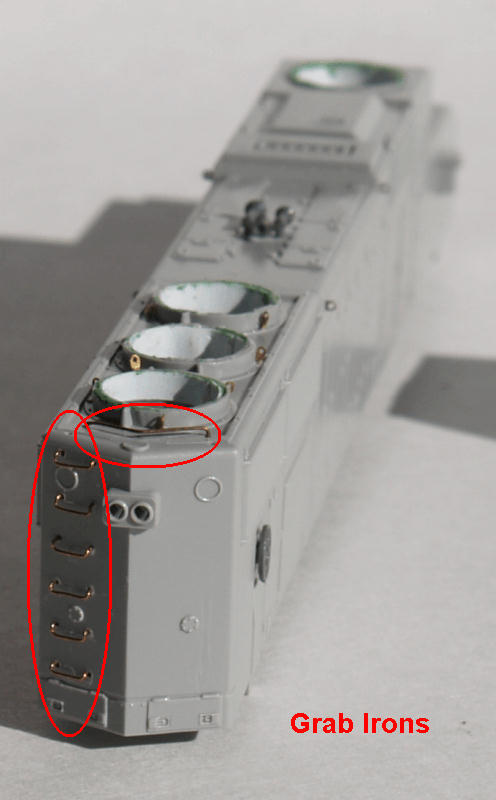
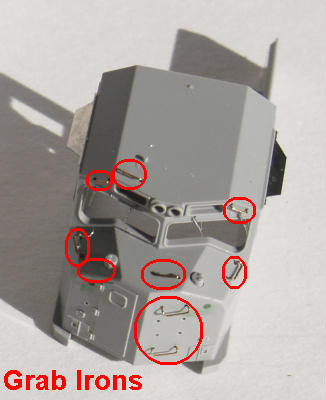
I cut off all the molded grab irons and lift rings with a razorblade. Although the molded grab irons are gone, they are still visible until the model is painted and I use them to find the right spot to drill the holes for the grab irons (See picture below and notice the still visible molded on grab iron). You also could use the BLMA drill template #57. A fellow modeler, John Dulaney, came up with in easy method to place the template in the right position. "I drill one hole, put a small piece of wire in it, slip on one side of the BLMA template, line the other hole up with where it is supposed to go, and drill"
Another seasoned modeler, Gregg Mahlkov, uses a drafting tool to insure the right distance of the 18" grab iron holes: "There's a very easy way to get the second hole the perfect distance from the first. They're called dividers and come with drafting sets. Drill the first hole and place one side of the dividers in it. Then press the other steel pin of the dividers at the second hole location and push down. You've got a point for the drill to grab and start."
I use a self-made 18" grab iron hole maker (see Tools) and mark the holes using the still visible molded on grab iron "shadows" as a reference. Don't push too hard with the sharp tip or you go right through the plastic. I use a number 80 drill for the holes. Don't use a power tool like a Dremel since the drill gets to hot and the hole will be bigger than a number 80.
I make cheap hand drills out of 1½" long wood dowels. I drill a hole in the top of the wood dowel, turn the drill around and glue it right into the hole (see Tools).

BLMA, Sunrise Enterprise and JnJ have lift rings of different shapes but for the SD70M I used BLMA cut lever rings since the looked the most authentic (BLMA EMD Cut Lever #13).
For the three lift rings around the fans, I used the Sunrise Enterprise #3009 lift rings. Note that the lift rings don't line up with the lift rings of the other fans. There are 2 more lift rings on each side between the rear fans that are not installed yet.

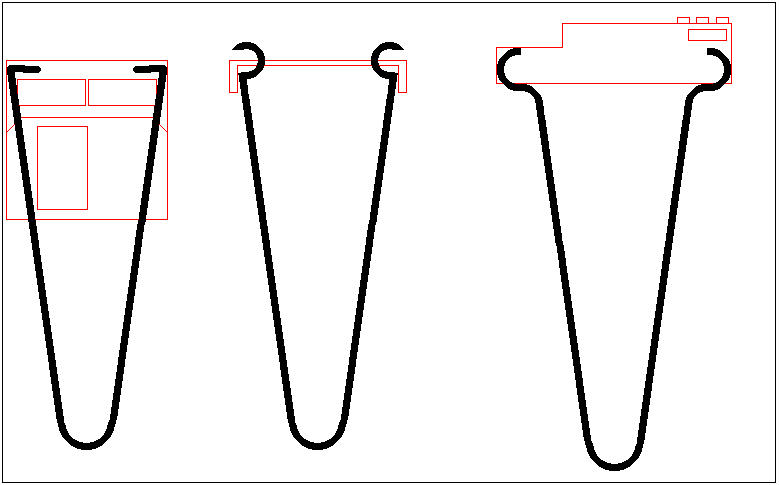
Next are the grab irons in the back including the V shaped grab iron right behind the last rear fan. There are two more lift rings right at the corner I have not installed yet, since I have to mask the red part on the top of the rear of the hood. You can see the holes I pre-drilled already. Make sure the grab irons are not to long and stick out inside the shell. They would interfere with the metal frame and it is impossible to cut them later in place. I use BLMA 18" drop grab irons #60 which are the best available since they are real wire (0.007") and not photo etched but they are too long and need to be cut shorter with a small wire cutter before installing them.
I use CA glue for all details even if they are plastic. I pour some of the CA glue on a plastic tray and dunk the end of the grab iron into the glue. Some modeler prefer to put the grab iron into the hole and glue them from the inside of the shell, which prevent the glue from messing up the outside part of the shell. I only use this method when I glue grab irons or liftrings to painted models.
Since we will paint the shell, a little glue on the wrong spot can be scrapped of with a razor blade. Dunking the grab iron in the glue also accumulates a little bit more glue than necessary, which fills the #80 hole that is much too big for a 0.007 thin grab iron. When all detail parts are in place and the glue has tried, I usually add more glue from the inside with a toothpick. It might be overkill but as you can see later, pieces can fall of.
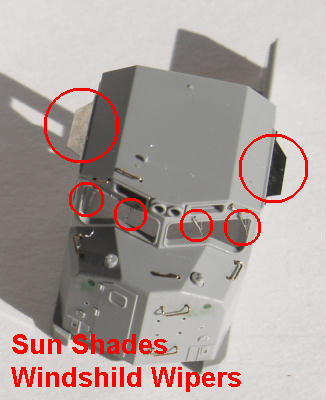
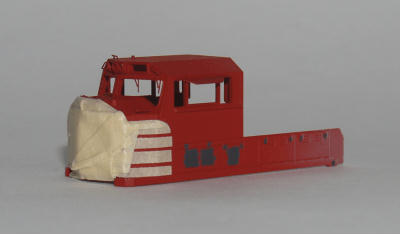
Next step is the detail parts on the cab. I used BLMA Angled Sun Shades # 74 for this model since I looked the best. I don't use the track part that come with the BLMA sun shade photo etching piece the Kato model has them molded on and they look fine. For the windshield wipers, I use the glass part of the model to locate where I have to drill the holes. Kato has the windshield wipers molded onto the glass part witch does not give you a lot of options, where you place them, except if you replace the front glass piece.
There are 4 grab irons on the front of the nose, 4 on the top of the nose, 2 next to the number boards and 1 on the roof. On the picture you see that I have not installed 2 of them in the front since they would interfere with masking or applying the SP letters, and one next to the engineer side sand filling hatch because of the masking tape. Use original pictures to find out, which type of grab iron you have to install (drop down or straight). Except for the drop grab irons, I bend the grab iron myself from 0.008" brass wire. I use the molded on grab iron to determine the size.
Make sure that all pieces are short and don't stick out at the inside of the cab, especially the glass part covers the inside of the shell.
In the last step I filled the holes for the nose hand rails and drilled new ones in the right position. I used 0.012" stainless steel wire for the new hand rails that would fit the new position.
Now we are adding the MU cable, hoses and cut levers. This is the first time I used Atlas MU cable which I really like since they are very flexible and only $ 0.50 a pair (Atlas # 9487356)
Since the Kato model uses plastic MU hoses in the rear with two holes each, you have to fill the pre-drill holes on the model. As a filler for the holes, I use Evergreen Styrene .020" Rod pieces instead of putty. The rod pieces are a little bit bigger than the holes so I use a #78 drill to enlarge the holes. For such small holes, the rods close the holes nicer than putty. Let the rods stick out of the plastic while drying and after the glue has set, cut those parts with a razor flush. In the front, the holes don't matter since the snow plow will cover it up. This also works fine for closing holes on the cab roof if I have to move the horns to a different location.
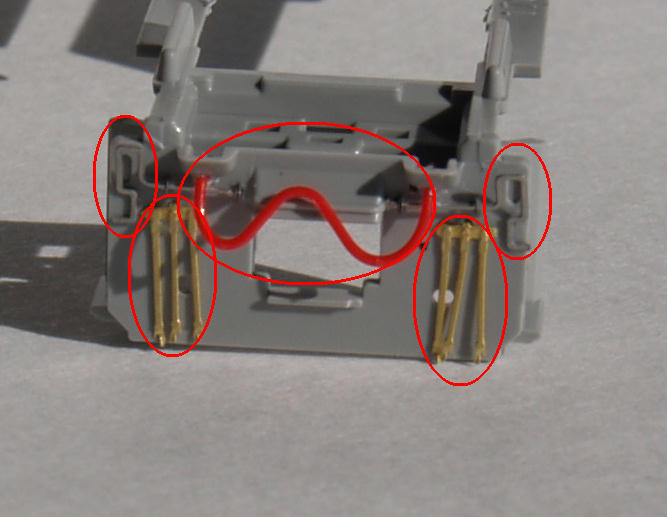
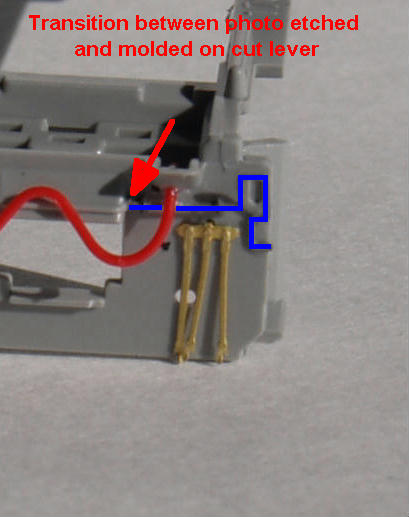
For the MU hoses and cut lever I used BLMA parts (#100 and 13). Unfortunately there is a little bit more work involved for the cut lever than usual. The Kato SD70M model has bulky part above the coupler which I did not want to cut off just do install the cut levers. So I cut the BLMA cut levers and only used the the handle plus about a 1/4 inch of the rod. (In blue: shortened BLMA cut lever)
I use a soft toothbrush, warm water and dish washing liquid to clean the parts from my oily fingerprints. After a cold rinse, I leave them to dry overnight. I also use Polly Scale Plastic Prep solution although I don't know if this is an overkill. I just don't want to find out otherwise after spending hours airbrushing the model.
I have lost so many lift rings that I double check after the model is dry if they are still there.
I use wire cloth hangers (the type you get with your dry cleaning) to hold the models for airbrushing. Nails in the overhang where I spray are perfect place to hang the models. I used the foam brush method but you had to move the foam between layers to get paint evenly on the model until Charles Hopkins showed my this trick of trade. He even uses the hanger to dry the models overnight on the ceiling.
There are 3 basic holders: Cab, Sill and body holder.
I use double stick tape or self-closing tweezers for smaller items like snow plows etc.
I don't get into the technique of airbrushing since you get a better tutorial from this web site:
Here is a link for a great airbrush tutorial with Polly Scale paint.
I only point out some of the trick I learned over the years. I use Polly Scale paint since I had the most success with this paint and my local hobby store has them always in stock.
I use about 70% to 30% distilled water. I use a small plastic bottle from the Container Store to mix the paint. Those are leak proofed platic bottles which means no air can get into the bottle and dry the paint out. The glass bottles with the metal cabs have the nasty habits of drying out and gluing the cab shut do the bottle. I never had a problem with the plastic bottles since the have a special seal.
Important notes about clumpy paint:
I use a paint strainer to strain the paint from the original Polly Scale glass bottle into the plastic bottle where the paint gets mixed with the distilled water. The paint gets strained a second time when I pour it into the airbrush cup. I learned that thinning the paint can produce clumps again. I never thin paint in the airbrush cup.
Although Polly Scale has my basic two colors, Scarlet red and SP dark gray, the red has to be mixed with SOO red to get a darker shade, since I tried to match the color of my Kato and Atlas factory painted engines. I use cheap Airfix airplane parts when I mix colors. Since they are almost the same plastic, usually molded in the same gray shade as Kato and Atlas models, they are perfect test pieces.
Now the fun starts. Some airbrusher use a primer but I don't see any advantages with dark colors on light gray models. I only use primer if the undecorated model has to different colors, like some Kato C44-9 (gray with black cab).
I also don't spray the entire model with my first color but I make sure that the paint does not stop abruptly.
Polly Scale paint dries usually within a few hours but I let it sit overnight.
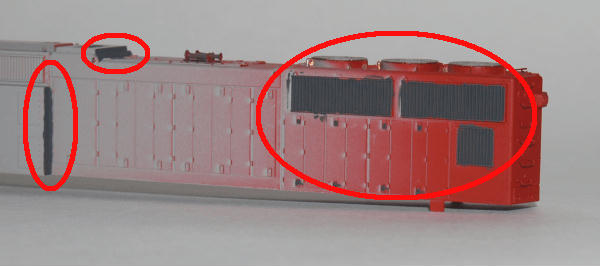
After the first color is applied, some prep work has to be done before I mask the model for the second color. I paint the grills with a regular brush in gray where they are covered with red paint. Since I try to airbrush away from the masking tape or straight down, angled grills can be tricky. I don't want to airbrush towards the masking tape and blow the second color paint underneath it. Two or three layers of airbrushed paint will hide nicely our handiwork. I also paint some corners as well since it is hard to get paint in those spots without putting on too many think layers in the surrounding.
I painted the inside of the fan openings black for a better contrast with the shiny blades (I will install later) and glue the 3 rear fans onto the fan housing (see BLMA How To Video on their web site) since they should be painted gray. The fan right behind the cab should be silver and does not get paint at all.
There are many different masking tapes around, cheap and very expensive but I use regular painter's masking tape. I never had paint peel off with this tape although it is much tackier than all the available model masking tape with the exception of the aluminum based paint like silver and stainless steel. That paint type should always go on last since it is very fragile and you can easily scratch it, too.
The brown masking tape sticks to the model nicely and can be pushed down into the tiny grooves and it sticks there. I use a paper folding tool to push the tape onto the model even on flat surfaces. I bought this in a paper store but I have no idea what it is called.
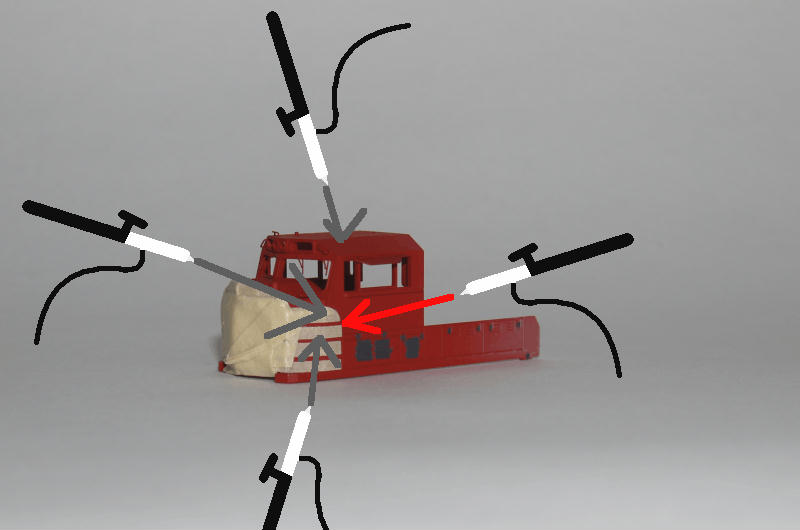
Before I airbrush the second color, I airbrush a thin layer of red paint right around the tape edges (see red arrow below). The red paint will flow into the possible gaps between the model and the tape and seal them. I use a lot of air and just a little bit of paint for this (double action airbrush required). You don't want color accumulating around the tape or you will have a little mountain range were the two colors meet.
This red thin layer of paint dries within a few minutes and the model is ready as soon as I have switched the color cups. Since there is still a possibility that the gray paint could run underneath the tape, I only spray away from the tape or straight down.
I usually wait about ten minutes before I pull the tape off. Ten minutes is about the time I can manage to wait and has nothing to do with the paint manufacturer's recommendation. Polly Scale dries very quickly which is also an advantage over solvent based paint. There is one disadvantage with acrylic paint I have experienced. High humidity or low temperature or very high temperature make it impossible to get a nice paint job. Since I paint outside, I can only do it in the summer on nice sunny weather with temperature not reaching 100 degrees. If it is too hot, the sprayed paint dries before it hits the model and you get a rough surface.
As you can see everything worked out fine and we got nice sharp paint lines. I few touchups are necessary around the corners but no paint got underneath the tape. The only place the tape took off some paint is on the corner of the lower metal grab iron.

The paint still needs to dry out completely to make it touch and almost scratch resistant. I have cheap Ziploc containers to store the painted models to avoid dust and cat hair.
I also paint the black plastic piece, called light shield, that goes inside the cab in a sand color. It hides a little bit the fact that the Kato cab is not see through like on the Athearn SD70M models . It would be nice if Kato upgrades their design for the cab as it did it on their new NW2 switcher.
After a day, the model is ready for some paint details. I use a paint brush No. 000 which I get in art stores. They are great, cost around $4 but only last about 2, 3 models.
Since black paint is easy to paint brush, I paint also the anti glare panel on the cab and behind the last fan housing at rear of the shell with a brush. Anti-glare decals are available but the don't work well with the cab sand filling hatches modern engines have.
For the white safety lines on the steps, I try to get a real think paint drop from the paint bottle. I use a toothpick to get the thick paint from the bottom of the bottle since I only want to apply it once. The more layers you put on the bigger the chance to paint the surrounding white as well.
I painted the blades of the fan white as suggested on the BLMA website and it really paid off. The next step for BLMA would be to figure out how to animate them.
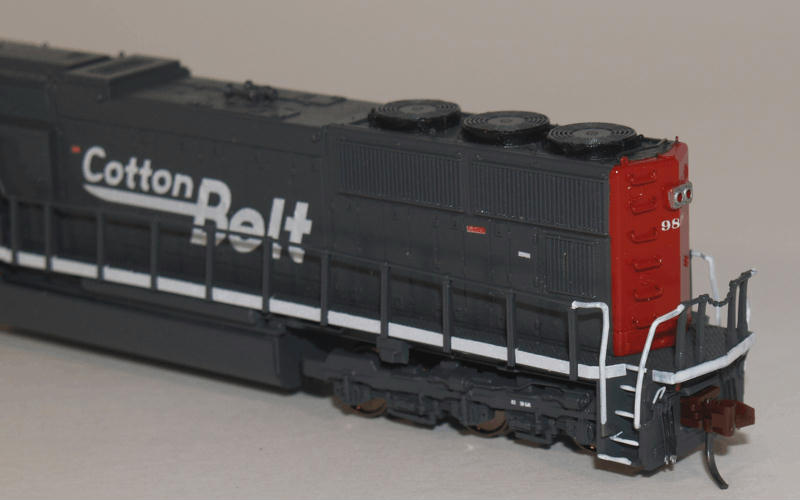
Now the detail parts like the lift rings at the red/gray paint line and the fan grill behind the cab are installed. The lift ring need to be painted red. Since the are really small, it will not be obvious that the were painted with a brush.
Of course there are a few more details that could be added to the model. Here are some I did on later models than the SD70M.
Besides the speed recorder (with white hose; discontinued Sunrise Enterprises part), I bend a 0.008 wire piece and connected the two break cylinders.
On the same model, I also added the grab irons behind the equipment box. Since it was impossible to drill holes into the part of the model, I cut a piece of thin styrene and attached the grab iron to that piece. The thin strip does not really noticeable thickness to the back part of the box.
I also paint the light shield in the interior colors of the engine, in this case sand. It looks more real than the black plastic that usually comes with the model.
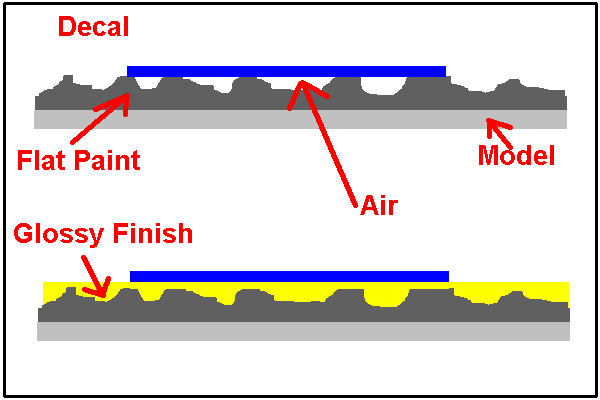
After all the paint is applied, the model goes into the paint booth again. I seal the model with glossy finish. We need a perfect smooth surface for the decals but water based paint is a flat paint. The rough surface creates a problem with decals. If air is trapped under the decal, "silvering" occurs where the decal has no printing (between letters, etc.). Glossy finish puts a nice even surface on your model and seals it at the same time. This will come in handy after decaling and before putting a final finishing on our model.
I spray at least three fine layers of glossy finish. The first layer is the most crucial one. If you get too much gloss on the model, the fluid will run down the plastic and ruin the paintjob. Take your time and lay one thin layer after another onto the model until the paint shines like a polished toy. Remember this is only for the decaling and we will tone it down with satin or flat gloss later.
Decals are actually a layer of special glue with printing on them. The thinner the layer of glue, the nicer it will look but also the easier the decal can rip. To avoid this, we wet the surface heavily with MicroSet or a similar product. After with prepared the decals according to the manufacturer's instructions and applied it roughly to the right spot, I use a soft square paint brush to push the decal into the right position. Keep the decal and the surrounding area flooded with MicroSet. As soon the decal is in the right position, I use a Kleenex piece to suck up the MicroSet. Avoid touching the decal. Smaller pieces are very attracted to the paper.
Modeler Rod Schaffter suggested to use "cosmetic sponges for pressing down decals. I got a bag of them at Walmart for a couple of dollars that will last me for years."
If the decal is applied over grooves, I gently push it down with my MicroSet moist paint brush. It takes time to get it right and as long as the area and the decal is flooded with MicroSet, there is no time pressure. As soon the decal dries out, it is almost impossible to lift it again without destroying it.
I use Tango Papa for my home made decals and they are extremely thin and rib sometimes just by looking at it. But there is an advantage of using such thin decals; Decals l can easily be pushed into the small grooves the models have around the doors on the side of the long hood. The decal paper also works with my color laser printer but I never had luck with any kind of decal papers and an ink jet printer.
Laser printer have a better color range than the Alps printer but only work with white background.
After drying the decal overnight, I apply 5, 6 times MicroSol with a brush directly on the decals. The fluid softens the decal and lets them slide down the groves. Don' force the decals down while soaked with MicroSol or you will rip them. Also don't try to move the decals but it is a good way to remove smaller decals if the ended up in the wrong spot. MircoSol usually dries within minutes.
After all the decals have been treated with MircoSol and the grab irons on the cab nose are installed and painted, I wash the model with water. MicroSet leaves sometimes a film behind that is easily washed off. Since we treated the decals with MicroSol and the paint with a glossy finish, both are not affected by the water. It also washes off dust. After drying the model in a covered box overnight, it goes back for the last time into the spray booth.
I apply 1 - 2 coats of glossy finish and than 2 - 3 coats of satin finish for engines and flat finish for cars. Satin is actually a mixture of flat and gloss and you could mix the the finish until you get it the way you like it the best.
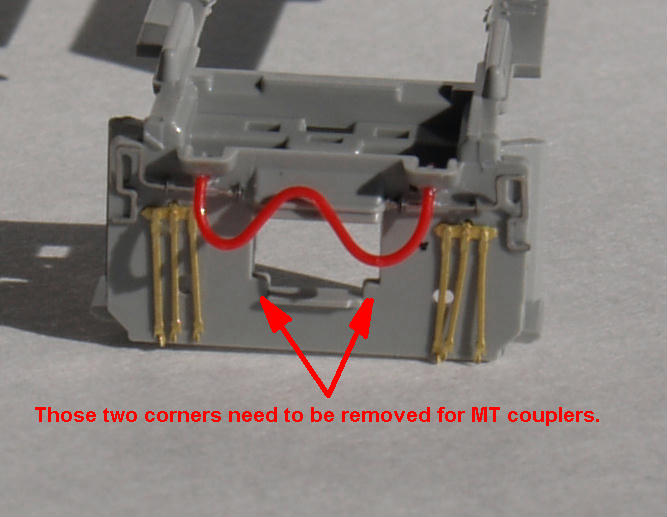
I use Micro-Train #1015 couplers for my models. The new type is made out of rust red plastic which looks better than the black plastic. To fit the couplers into the Kato's coupler housing, you have to cut the corner notches in the lower part of the housing.
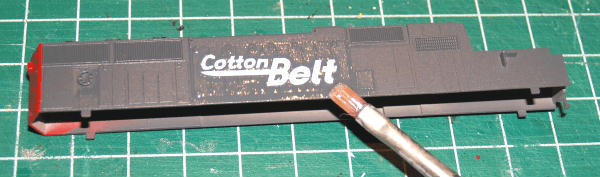
The last step is to take pictures of your new model. Only photos reveal problems like the missing windshield wiper that got lost on the Cotton Belt model when I installed the glass in the cab.
How to protect your new model in the old box needs to be addressed as well.
Since we added sun shades, we have to cut a piece from the bottom foam. So that the cover does not press onto the other sun shade, I glue a small piece of styrene on the outside of the box. I could have used transparent styrene to make it less visible.
Now the cover cannot closes all the way anymore and there is no pressure on the model.
How about special inserts for our custom paint job.
I scanned a Kato insert sheet and used a paint program to change the description and road numbers.
As I mentioned in the beginning, this is a tutorial that exactly tells how I detail and paint my models. I did not hold back any secrets I know off and if you have trouble getting the same results, please let me know and I will add more explanations where I was too shallow. This is also a tutorial in progress and I am happy to include your ideas you came up with to make the process faster and easier. If you have a source for great details that I have not used yet, please let me know so I can give it a try.
Roland
helveticarr@aol.com
Improvements of this tutorial were suggested by following modelers of the Atlas and The Railwire N-scale forum: Tom Mann, John Dulaney, Mike Skibbe, Gregg Mahlkov, Rod Schaffter, Steve Wiedmer, BenW
A special thanks to Kato, Sunrise Enterprises, JnJ Trains and BLMA. Without them our hobby would be really boring.